Intersession starts at 3:30 today, for most people....
I signed up to teach 3 half days (it was a full week before the snow makeup days came). It won't be so bad. I love teaching a small group and I am only teaching math (my fav. subject to teach).
But I am making a list of the things I want to do on my time off...
Remember the ugly gold leaf frame I picked up at the Salvation Army? I am totally going to do this with it.
Also, that chair I picked up for $7.00 at Goodwill? I am going to transform it too.
Then I am going to get in the yard and build a garden box, and plant some veggies.
I also want to make one of these for my gift wrap very badly...
My iPhone needs some more style... and so does my bicycle.
I am really wondering what a window seat would look like in our kitchen, and is there room?
And this wreath for the door.
Oh, and this tank would look so cute with a cardigan...
Wouldn't this be cute for the living room?
Mix that with a lot of time spent with family, friends, probably more crafts, and some R&R and that makes for an awesome intersession!

Showing posts with label Crafty. Show all posts
Showing posts with label Crafty. Show all posts
Tuesday, March 16
Saturday, March 13
What a Find!
Remember this post?
Well guess what I found this morning?

Oh yes, I have BIG plans for both of these... now if only the weather will cooperate... Stay tuned to see what awesomeness I make out of these!
Well guess what I found this morning?

Oh yes, I have BIG plans for both of these... now if only the weather will cooperate... Stay tuned to see what awesomeness I make out of these!
Thursday, March 4
Busy!
Yesterday was a very productive day! I am so pleased with all the things I was able to complete! Thank goodness for a Snow Day!
As you can see from Wordless Wednesday 40 I made 3 onesies for different folks, and 2 name tag lanyards for a friend and myself. I think they turned out sure cute! I am seriously thinking I should have seasonal ones... someone stop me! ;)
I also finished a quilt. Yes, I didn't post pictures of it because its owner has not seen it yet. I hope to get it to them very soon and then I can post some pictures.
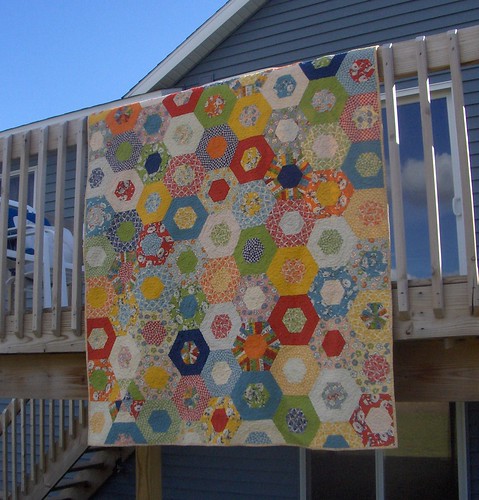
I've also picked a quilt design out for Matt and I that I plan to start over break (as long as an order doesn't pop up). It is a design that Sarah and I found at the quilt show. I finally got the triangle template Sarah! :) Here is an example:

This was found on Flickr
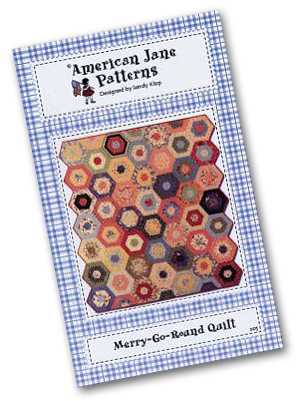
I plan on using a lot of blues and greens (shocked I know). Here is a picture of the pattern itself.

Its called a Merry-Go-Round Quilt and it is by American Jane
I am very excited for tonight... Brand New Office! YES! Good bye Olympics, hello good TV! I am also happy to announce that we have really had great success with meal planning this week! Each day Matt and I have had lunch (from leftovers) and a delicious dinner! I hope we can keep it up!
As you can see from Wordless Wednesday 40 I made 3 onesies for different folks, and 2 name tag lanyards for a friend and myself. I think they turned out sure cute! I am seriously thinking I should have seasonal ones... someone stop me! ;)
I also finished a quilt. Yes, I didn't post pictures of it because its owner has not seen it yet. I hope to get it to them very soon and then I can post some pictures.
I've also picked a quilt design out for Matt and I that I plan to start over break (as long as an order doesn't pop up). It is a design that Sarah and I found at the quilt show. I finally got the triangle template Sarah! :) Here is an example:
This was found on Flickr
I plan on using a lot of blues and greens (shocked I know). Here is a picture of the pattern itself.
Its called a Merry-Go-Round Quilt and it is by American Jane
I am very excited for tonight... Brand New Office! YES! Good bye Olympics, hello good TV! I am also happy to announce that we have really had great success with meal planning this week! Each day Matt and I have had lunch (from leftovers) and a delicious dinner! I hope we can keep it up!
Tuesday, March 2
Drool Worthy...
Things I found online today that make me want to lock myself away in my studio (I feel so fancy when I call it that, I can hear you laugh Alex... stop it).

Link to this awesome quilts owner... Oh, Fransson!

Make your own stamps? Yes, Please!
Link to this awesome quilts owner... Oh, Fransson!
Make your own stamps? Yes, Please!
Sunday, February 21
Catch Up...
So I realized that I have had some crafty pics that I haven't gotten around to uploading, mostly because they were gifts and I didn't want to ruin a surprise!
Made these little fellows for 2 teachers at school having little boys...
.jpg)
Are they not the cutest thing you've ever seen?!


Diaper Wreath I made for Amy's baby shower.


A couple of quilts: The first one is a t-shirt quilt made of vacation shirts that a lady at work has collected over the years. The second is a SUPER cute baseball quilt made for a friend having a little boy.


These 3 quilts were an order for Christmas. Can you tell that I am into stripes right now? Love how clean they look. The middle one is backed with University of Tennessee fabric.
If you want to read more details about the quilts, check out my quilting blog http://www.courtneyquilts.blogspot.com/
Whew, I think that is just about everything... now I can clean off the camera card!
Wednesday, February 10

Sunday, January 17
Something to Share Sunday
The house is coming together well :) I am pleased with what we have accomplished so far! I have a few more ideas for things I want to create to go in the house...
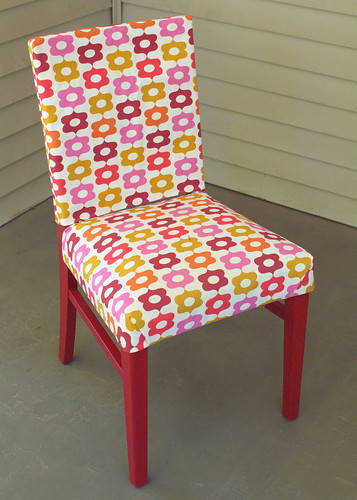
I plan on hitting a ton of second hand shops tomorrow in search of a big funky frame and an old cheap chair...
Why you might ask? Well, the chair is something I look for everytime I go to a thrift shop/yard sale/flea market. I want to try to take a chair and redo it. I have wanted to do this for awhile now. I bought a staple gun for that very reason... I see it happening soon.
Here are a few inspirations...

http://pearvana.com/2009/06/20/the-lazy-girls-guide-to-recovering-a-chair/

http://howaboutorange.blogspot.com/2008/02/how-to-paint-chair.html
So why the big funky frame? Cause I want to try this: http://makeitandloveit.blogspot.com/2009/03/picture-frame-dry-erase-board.html

http://littlenannygoat.blogspot.com/2009/08/funky-frame-take-2.html
(Except instead a of chalkboard I want a whiteboard)
I want a dry erase board for my sewing studio but couldn't bear to hang a boring white board in there. This will solve that problem! But I want a fun white or colored frame and I want to try it on the cheap... so here's to Happy Hunting!
I plan on hitting a ton of second hand shops tomorrow in search of a big funky frame and an old cheap chair...
Why you might ask? Well, the chair is something I look for everytime I go to a thrift shop/yard sale/flea market. I want to try to take a chair and redo it. I have wanted to do this for awhile now. I bought a staple gun for that very reason... I see it happening soon.
Here are a few inspirations...
http://pearvana.com/2009/06/20/the-lazy-girls-guide-to-recovering-a-chair/
http://howaboutorange.blogspot.com/2008/02/how-to-paint-chair.html
So why the big funky frame? Cause I want to try this: http://makeitandloveit.blogspot.com/2009/03/picture-frame-dry-erase-board.html
http://littlenannygoat.blogspot.com/2009/08/funky-frame-take-2.html
(Except instead a of chalkboard I want a whiteboard)
I want a dry erase board for my sewing studio but couldn't bear to hang a boring white board in there. This will solve that problem! But I want a fun white or colored frame and I want to try it on the cheap... so here's to Happy Hunting!
Sunday, January 10
Not So Lazy Sunday
Whew! Another busy weekend full of fun and house work. Matt and I have been busy trying to get things on the wall.
Speaking of things on the wall I worked on the corkboard Matt hung this week. Here's what it looks like now!

Here's How I Did It!

1. Buy a regular corkboard from Walmart, Target, where ever. This was a large one from Walmart.

2. Gather materials needed to alter boring corkboard

3. Trim your fabric so that you have 1/2 inch more than the corkboard itself (not the frame, the fabric should on cover 1/2 the frame). Lay nice and flat. Lift half of it back and spray the corkboard with glue then press and smooth fabric out. Repeat for other half.


4. Take your paint scraper and press against the fabric, forcing it under the frame of the corkboard. This angled scraper worked much better than a flat one.

5. This is what it should look like when you pull the scraper back out. Continue to do this all around the board.
6. I didn't take a picture of the painting process, I was afraid to get paint on the ol' iPhone... but you get the idea, paint the frame. I had to rough up the frame because it is cheap laminated wood... if this is what you are working with, rub it with sandpaper. After 3 coats of paint it will be fine...
7. Step back and enjoy what 30 minutes and a little work will give you!
Saturday, November 14
Sewing Studio
Introducing my Sewing Studio...


I think I am in love. The colors are perfect, the size is great, all that I need to do now is get some things hung on the wall...


I think I am in love. The colors are perfect, the size is great, all that I need to do now is get some things hung on the wall...
Monday, October 19
Cake Class
Tonight was the last night of cake decorating class. I think my cake turned out well, even though the teacher said my icing could have been smoother. Oh well, it is what it is and I wasn't spending 5 hours on it. Seriously some people spent many many hours on their cake. It took me 1 hour to decorate plus the time to bake it... bam.
.jpg)
.jpg)
This is my cake. I liked it. Simple cute design. I do not like the borders but they were very last minute (we were being timed, we only had an hour to complete our cakes). You could bring in pre-made things from home to decorate your cake with, but I chose to not do any of the roses or sugar flowers. Everyone besides Amy and I brought in pre-made pieces.
This is Amy's cake. I wish I had a picture of the side of it. Amy had little fish and corral all along the sides...
.jpg)
I really like the way Amy used cookie crumbs as the sea floor.
Here is a group shot of all the cakes...
.jpg)
.jpg)
.jpg)
This is my cake. I liked it. Simple cute design. I do not like the borders but they were very last minute (we were being timed, we only had an hour to complete our cakes). You could bring in pre-made things from home to decorate your cake with, but I chose to not do any of the roses or sugar flowers. Everyone besides Amy and I brought in pre-made pieces.
This is Amy's cake. I wish I had a picture of the side of it. Amy had little fish and corral all along the sides...
.jpg)
I really like the way Amy used cookie crumbs as the sea floor.
Here is a group shot of all the cakes...
.jpg)
Monday, September 14
Cake Decorating Class
Know where you can find Amy and I on Monday nights? Cake decorating class! Here's a look at what night one was like...
Practicing vines, rosettes, and stars...
.jpg)
Amy's proud of her vines...
.jpg)
We're working hard!
.jpg)
.jpg)
Ta Da! Finished Cardboard Decorated Circle
.jpg)
Poor Matt and Daddy, they were so upset that the "cakes" were cardboard...
Practicing vines, rosettes, and stars...
.jpg)
Amy's proud of her vines...
.jpg)
We're working hard!
.jpg)
.jpg)
Ta Da! Finished Cardboard Decorated Circle
.jpg)
Poor Matt and Daddy, they were so upset that the "cakes" were cardboard...
Subscribe to:
Posts (Atom)